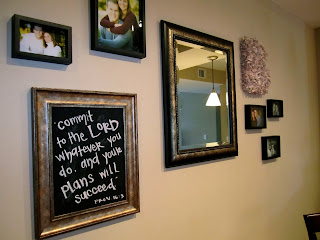
First up: Framed Chalkboard
What you'll need:
- A Frame. Literally any frame in the world.
- 1 piece of poster board
- Chalkboard spray paint
- Chalk, duh
Like I said in a previous post, I pretty much followed the directions from this blog and it was basically the easiest, cutest thing I have ever made in my life. Start by removing the glass from the frame and trace its shape on your piece of cardboard. Cut out the rectangle (or circle, or whatever it may be) and head outside with the cardboard and a can of chalkboard spray paint...
This was surprisingly easy to track down at Home Depot. Go somewhere outside that is well-ventilated and away from anything stain-able. I opted for my balcony. Because my options were limited in/around our apartment, and because I was being a bad tenant but I swear it didn't leave much of a mark. Lay your cardboard flat and spray paint away! I did a couple of layers so it was thickly coated, then let it dry for an hour or so.
Place your chalkboard spray painted cardboard into the empty frame... and then do as you please! I have seen these used as: menu displays, grocery lists, To-Do reminders, kids' daily chores/schedules, and in my case... as a place to display inspirational verses and quotes where we can see them on our way in and out of the house every day!This is probably my favorite DIY craft of all time. I love how easy it is to customize, and the fact that it took me a grand total of 10 minutes was definitely a plus! I am excited to wipe it clean and doodle on a new verse... its been the same one for a couple of weeks, so I think its due for a change this weekend :)
Second DIY-er on this wall: Book Page Initial
What you'll need:
- Styrofoam square letter
- Hot glue gun
- A recycled book
- Some sort of knife if you are a weirdo like me
I had been itching to make this ever since I made my sister a book page wreath for Christmas! But given the time it took - and the finger burns I incurred - to make her such an intricate wreath, I modified the process a lot for this project. I started with a square of styrofoam from Michael's and used a steak knife (don't judge!) to carve out the initial of our last name. "B" obviously. You can buy foam letters, but I couldn't find a "B" so rather than continuing to look I decided I'd just make my own.
After you purchase/create your letter, sit down at a comfy table... you'll be there a while. Start by ripping out book pages and tearing them into squares about 2"x2" while your glue gun heats up. After you have a couple hundred squares torn up, start literally crumpling them into something that resembles the shape of a paper fan. Dab a few dots of hot glue down on your letter - you can start anywhere, as the whole thing will eventually be covered - and smoosh down the crumpled paper on the glue one square of paper at a time. Careful not to touch it... ouch!
After you've got the main surface covered, start filling in the inside of your cut-outs and cover the sides of the letter. If you look closely, you can still see white styrofoam inside my cut-outs... I literally only covered the areas that were visible from a normal vantage point ~ no more, no less! This recycled book page craft was much less tedious than the wreath I made for my sister, but it still took about an hour to finish. After I was done, I put a nail in the wall and balanced it from the top cut-out of the "B." Then I sat back and admired my work!
The "B" is a nice, subtle touch to the wall. I'm proud of my DIY decor and I'm always excited to find new ways to incorporate a monogram or initial into my life (obsessed? yes)! The total cost for both of these little projects: $30. Not bad, eh?
Easy. Adorable. Custom. Inexpensive. What's not to love?!


No comments:
Post a Comment
Thanks so much for taking the time to leave a comment! I'll do my best to respond :)