Showing posts with label Recipes. Show all posts

February 24, 2012

Cookie Favors

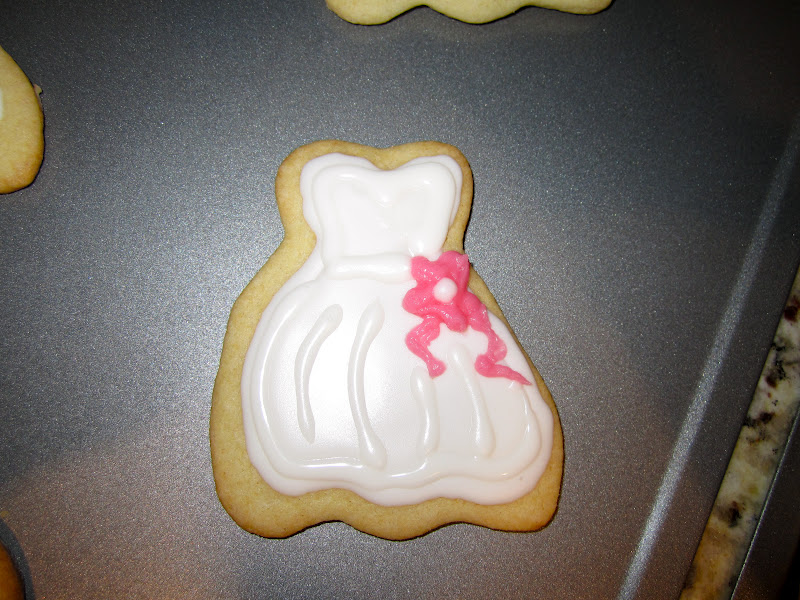
As promised, here is a tutorial {of sorts} showing you how to make the wedding shower cookie favors I made for Sheila's bridal shower! Because my schedule is a little hectic this semester, I cut every possible corner... and I mean that in the nicest possible way. What I mean is ~ these cute, custom cookie creations were not made from scratch. And yes, you too can make these in any shape and any color for whatever shower or party you might be hosting!

What you'll need:

Cookie cutter(s)
Treat bags with ribbon

What to do:
Make the sugar cookies according to the instructions on the package. There will be a slight variation to make cut-out cookies (usually its just adding some flour). Rolling the dough and cutting the shapes is annoying... but you get to eat more scraps that way so just eat your way through the process :) Let cookies cool completely for about 30 minutes before decorating.
You should end up with a bunch of these!

I started by outlining the cookie with Wilton's Cookie Icing, and I found that heating the icing in the microwave for about 30 seconds to start, and then zapping it for ~10 seconds every handful or so of cookies kept it soft enough to work with.

They do NOT need to be perfect to look beautiful!
Then go back and fill in the outlined cookies with icing. If you heat up the icing, it helps it to "flood" more easily. Be patient - this is really tedious and your hand will start to hurt, but fill in your outline completely and try to swirl around the tip of the icing dispenser to get rid of any air bubbles.
This next part is really important... let the icing dry completely!!! I can't tell you how many cookies I ruined making cookies for Danielle's baby shower because I couldn't just sit still and let them dry. I learned my lesson... this time I gave the cookies a solid 45 minutes of dry time before I continued decorating them. When the icing is allllll the way dry you're ready to decorate with the Decorating Icing.
If I've learned anything at all about dessert decorating over the course of all my Martha Stewart wanna-be baking adventures, its this: Piping bags (and tips) are your friend! Even when using pre-packaged icing, I always always use a piping bag. The reusable ones are great, and for these cookies I just used a plain round piping tip. I've also found videos like this to be really helpful ~ I can now fill my icing bag and fasten the top so that I don't end up with a mess of pink icing all over my hands :) It's the little things...

Once your icing bag is filled up, you're ready to pipe! I browsed Pinterest for some inspiration ideas, but I sort of just made up my own designs until I settled on one I liked.
After I had my pink flowers on each and every cookie, I used the Wilton's Icing Writer to add some white-on-white accents to the cookies. This added texture and interest... but it was also great for hiding imperfections!

I traced back over the flower petals so that they were a little neater and raised a little higher. Then I let them dry for a loooong time. At least an hour before I started packaging them. I actually used lollipop bags that came with ribbon attached (found at Michael's) and cut little hearts out of a sheet of scrap book paper for the packaging. They turned out so adorable!

These were really fun and easy to make. They weren't "perfect" but thats what made them so unique! There was no denying that they were homemade... and most importantly, the bride loved them :)

Questions? Send them my way! Hope this was helpful!

February 17, 2012

Priorities

With a lot on my plate these days, I've had to re-prioritize.

One thing that needs to take a back seat: my blog.

I  love using this little corner of the internet as a way to document what happens in our life, and I plan to still do that... when I have the time. But truthfully, blogging (among other things) has become more of a chore than a hobby... so, expect my posts to be less frequent until things slow down.

The recipes, the crafty stuff... I just don't have time for right now. I wish I did! {But I do still promise a cookie favor post... I just need to get the pictures off my dang camera one of these days!}Maybe after I graduate in May. Until then, I'll stick to the big stuff. And pictures from my iPhone :)

Our Nashville trip was SO MUCH FUN! We loved the food, the music, the BOOTS! I still don't quite know what "honky tonk" is. But I'm pretty sure I like it! I have real camera pics that I plan to upload as soon as I have a free weekend, but here are a few randoms until then.
We bopped from bar to bar to bar... we wanted to check them all out! SO FUN!

I think I gained 9812349 lbs. Add that to my holiday pounds and I'm not sure how I'm fitting thru doorways.

My love affair with cute downtowns was reignited!
We left Nashville completely exhausted... we're getting too old to pretend we can stay out until the bars shut down! The list of to-do's I came home to was really overwhelming but it was so worth it for such a fun weekend. This was technically Andrew's "birthday trip"... we prefer those to birthday presents... but we celebrated his real birthday on Valentine's Day anyway! It was his 25th, so I decided it was worthy of a big fuss even if the bday boy wasn't going to indulge me in throwing a party!
A steak dinner, chocolate covered strawberries for my cake-hating-husb, and Maui Jim sunnies!
Fighting the Valentine's Day crowds at restaurants is his least favorite thing to do on his bday (duh)... so we opted for a quiet dinner at home - some fancy steaks and baked potatoes. He must have said 15 times how glad he was that we decided to cook at home haha :) My healthy husb loathes sweets... bless his heart. So I reluctantly agreed not to bake him a cake. He did eat 1 chocolate covered strawberry, after my nagging urging...... I ate the remaining 5. We agreed that we'd take weekend trips instead of getting birthday gifts for each other this year, but I was sneaky sneaky and surprised him with a pair of sunglasses he has been wanting for months! He was so. surprised! He deserves them.

**HAPPY 25th BIRTHDAY, ANDREW!**

In other news around these parts........ Bella loves the faux fur throw Danielle picked up for me because it was a "great deal" and I just "needed to have it" (gotta love friends like that!), I represented my very first client in my very first hearing (woohoo!!), and you have to make these red velvet cookies!
Sleepy kitty snuggling with her new furry friend...

Looking all lawyer-like...

Make these!!!
This weekend is Sheila's bachelorette party!!! I'll be cozied up in a mountain cabin sipping champagne and doing my best to embarrass the bride with gag gifts. It'll be a rainy one down South....... perfect weather for baking some yummy cookies!

October 11, 2011

Baby Shower: The Desserts

I. love. baking. 

I'm not quite as big of a fan of cooking (much to my husband's disappointment). I'd much rather bake a cake or decorate cupcakes than cook healthy dinners. Although, I do my fair share of both. The only problem I have with baking: not enough people to eat my sweet treats!!! 

Since Andrew doesn't eat - or even like - sweets, I try my best not to make them unless there is a special occasion where I'll get to share them...... otherwise I end up eating a pan of muffins. Or a loaf of banana bread. Or a couple dozen cookies. Or an entire cheesecake (I almost didn't fess up to this one. Sounds so much more disgusting when I see it in writing!). 

Insert: baby shower. The perfect excuse to bake to my little heart's content! And bake I did. Danielle has a full container of cookies and a couple dozen cupcakes in her freezer for when baby Gia arrives and they get extended stay house guests to entertain for a few weeks! 

I won't bore you with the details, or insult your Martha skills - we all know how to make cupcakes and sugar cookies. Right? Well, next time you want to make fab vanilla cupcakes {or a cake, I suppose} I hiiiighly recommend this recipe! So moist, so easy. Its my new vanilla go-to. 

I found the cute pink cupcake liners at Michaels. I cheated a little and bought the strawberry icing (whipped) in the baking aisle and piped it using a disposable decorating bag and a "petal" tip. I found a few tutorials online for how to frost a cupcake like a pretty little rose... some were more helpful than others, but I mostly had to wing it. For a point in the right direction, check out this short video.  My decorating tip was way smaller, and the icing I used wasn't as stiff so they look a little different - but same idea.

I also made a batch of strawberry cupcakes - from the box... gasp - and piped vanilla whipped icing on top, then covered with hot pink sprinkles! All day people kept saying that they were too pretty to eat. Whaaa?? Might explain the dozens of left overs...
The sugar cutout cookies were a bigger hit than the cupcakes as far as actually getting eaten. They look less intimidating... easier to grab as you walk by the table and munch on while you chat I suppose. Anyway, I ended up just using a sugar cookie mix instead of my Nana's famous recipe just for the sake of saving some time in a busy week and I will never ever ever make cutout cookies this way again. Swear. They were too sticky as dough, too thin as cookies, and just flat out a hassle. Nothing like my Nana's! But they looked cute for my purposes.
I got a pack of 4 baby themed cookie cutters at Michael's, just to have the onesie shape! I'm sure I'll reuse them all at some point though. After I mixed, rolled, cut and baked... I used Wilton's "Decorator Icing" (white & pink) aka "flooding icing" to decorate the cookies. I was impatient with letting them dry the recommended 1 hour before adding a top layer, so my "G" cookies sort of bled together... hindsight, I would have definitely let them dry a few hours or over night.

With the heart onesie ones, drying time wasn't an issue because I used a tube of thicker decorating icing for the details. That's another option for next time :)


The "G" design wasn't a novel idea I'm sure, but it didn't take much inspiration either. But the decorating details for the heart onesie design were definitely Pinterest-inspired!  The baking and decorating for all of these sugar-packed pink treats was a time-consuming (2-day) process, but was so so fun! 

I feel like I learned a lot about dessert decorating last week - particularly some ways to improve for next time. Luckily, my crowd was easy to please and they didn't seem to mind any imperfections! As with most kitchen endeavors, I figured out what corners I can cut for time-saving purposes, and what not to half-ass in the future! 

Canned buttercream frosting: sometimes do. 
Bagged cookie mix: definite don't. 
Packaged flooding icing: do. 
Let icing fully dry next time: 100% do. 

I'm not sure when I'll get a chance to bake cookies and cupcakes galore again, but when the time comes I'll be ready!

October 5, 2011

Pepperoni Rolls

I've never really thought about how traditions get started. But I think we may have just started one of our very own in recent weeks!

My mom always makes "Pepperoni Rolls" around the holidays. Hundreds and hundreds of them. She brings them to every holiday gathering, and always has them sitting out when we have winter company. Our whole family loves them - and my sisters and I love helping her make them. Someone gets designated as the "pincher" or the "roller" and my mom pulls tray after tray in and out of both ovens while we giggle and gossip and eat raw dough :)

Now that I live 11 hours away from my mama, I have tried to recreate some of my favorite things she makes (that I miss!). A couple weeks ago, I decided I'd make her pepperoni rolls to bring to our "Football Sunday" with some friends... I didn't realize that they'd be such a big hit! Husb asked me to make them again the next Sunday, and the next...... and just like that - we had our very own "Football Sunday" tradition! These little little pizza bites are easy to make, and even easier to pop in your mouth game after game all Sunday long.

What you'll need:
Frozen bread loaves
Sliced Pepperoni
A block of Mozzarella Cheese
Olive Oil
Italian Seasoning
Parmesan Cheese
Thaw a loaf or two of the bread dough according to the directions on the package (I thawed mine in the refrigerator overnight, then let it "rise" at room temp for a few hours the morning I made the rolls). Cut the pepperoni in half and cut the mozzarella into little cubes.

Pinch off a little dough and stuff it with 2 slices of pepperoni and a cube of cheese. Squeeze the seam tight and roll into a ball... place on a non-stick baking sheet about an inch apart. The dough will rise quite a bit in the oven, so use as little as you can without having the pepperoni or cheese poking out. Mine were about 1-1.5" in diameter before baking, and I could fit around 25 on each baking sheet.
Pinch, stuff, roll and repeat until you have filled an entire baking sheet. Using a pastry brush, lightly brush the tops of the rolls with a little bit of olive oil and then sprinkle with italian seasoning and parmesan cheese.

Bake at 350* for 15-20 minutes, or until the tops start to get just a litttttle golden brown. If you don't pinch them tight enough, you'll have some "oozie" ones - cheese will spill out, but not a big deal, I just pull off the burnt cheese to make them look prettier. (And eat the melted cheese as you go, of course!)
I didn't think to take "after" pictures until I was on my very last baking sheet, so it wasn't filled - but you get the idea. I let the pepperoni rolls cool on the baking sheet for 10 minutes or so, then piled them into an oven-safe dish to serve. You can serve them room temperature, but I usually pop them back in the oven for 5 minutes or so to warm them, and I put them out with a little dish of warm marinara sauce for dipping.
Its safe to say that I never have - and probably never will - go home with left overs! These bite-sized treats are sure to be a hit wherever they turn up... holiday parties, game day gatherings, or anywhere else you decide to take them!

I didn't have my momma's kitchen, or my sisters to help me pinch and roll... but I do have a new(ish) tradition of my very own. Our Football Sundays will now forever include Pepperoni Rolls :)

September 28, 2011

Crock Pot Breakfast Casserole

My husb loves his food all mixed up. Its not really my thing, but this breakfast casserole was really good.

Best part? It cooked itself - overnight! Nothing like waking up on a Saturday to an already made breakfast :)

What you'll need:
A dozen eggs
A bag of frozen hashed brown potatoes
Jimmy Dean sausage (we used HOT!)
Tomato (1-2)
Red Onion
Shredded Cheddar and Mozzarella Cheese
A littttle milk
Oregano
Salt & Pepper

 What to do:
Brown the sausage in a pan. Chop the onion. Dice the tomato. Whisk up your carton of eggs w/ a splash of milk. And start layering all the ingredients in a slow cooker (I sprayed w/ non-stick stuff first, just in case!) but save the egg/milk mixture til the end...

So, layer half of the potatoes + half the browned sausage + half of the tomatoes and onion + half a bag of each shredded cheese + a few dashes of salt, pepper and oregano...


 After you repeat the layering, pour the egg/milk mixture over the contents of the slow cooker as evenly as possible. Throw whatever is left of the shredded cheese on top -- and any other cheese remnants you find in your fridge if you have a cheese-loving husband like mine!
That's it for the prep! How easy?! Cover and cook on low for 7-8 hours... and when you wake up, your house will smell de-lish and you can roll out of bed to find this waiting for you:
Confession: We slept in way late, and this was left in the slow cooker on low for much longer than I care to admit. The cheese on the edges got a little burnt, but luckily we're weird and like burnt cheese ;) Really though, I wouldn't leave this in the crock pot on low any longer than you have to. It was awesome regardless - but would have been even better had we got our lazy butts out of bed at a decent hour.

Disclaimer: This makes so. much. food. We ate it on Saturday. Again on Sunday. And Andrew kept eating it for at least 3 days after that. You could just as easily half this recipe and bake it in a casserole dish for 30 or so minutes rather than slow cooking it if you didn't intend to feed an army. Or..... a family of 2 for a week. I think taking out the crock pot aspect sort of takes the fun out of the recipe - my opinion - but do whatcha want!

Self-cooking Saturday morning breakfasts -- file this recipe under: SUCCESS! Perfect weekend bfast for a hungry husb and a lazy, sleepy wife. 

September 14, 2011

Quinoa Salad

Remember that recipe I promised to post a billion years ago? Well... I found the draft. Unpublished. Oops. So, here it is ;) 

Have you guys discovered quinoa yet? My mom is a dietitian and has introduced us to all sorts of great healthy recipes over the years. This quinoa salad was actually discovered by my sister, but its health-freak-mother-approved and is definitely one worth sharing, for more reasons than one - its delicious and nutritious.
 
Quinoa at first glance looks sort of like rice. But its actually a grain and a protein and a relative of the leafy green vegetables. In my book, this basically translates into SUPERFOOD. Check out all of the nutrition packed into this crazy little "seed":
via
Quinoa is a complete protein - which is just fancy nutrition talk for "it includes all 9 essential amino acids." In addition to the health benefits of whole grains and amino acids I'm sure we all know about, check out the links below if you want more info about this nutrition-packed protein/grain superfood and some other fun ways to prepare it!

Now, onto my quinoa recipe of choice: Quinoa Salad

What you'll need:
1 (or 2) Cucumber(s)
1 Red Onion
2 Tomatoes
1 can of Corn
Chicken Broth
Olive Oil
Lemon & Lime (or juice)
Kosher Salt
Pepper
Feta Cheese
Mayonnaise (reduced fat or made w/ Olive Oil preferred) 
Fresh Cilantro

What to do:
Cook 1 cup Quinoa in 2 cups of Chicken Broth per the directions on the packaging. While its cookin' start chopping up your veggies... the cucumber, tomatoes {I used cherry tomatoes this go around}, and onion.
Uncooked Quinoa

After your Quinoa is cooked, put it in a large mixing bowl and add your {drained} can of corn and the diced cucumbers, tomatoes and onion. Chop up a handful or so of cilantro and add that to the mix as well! This fresh cilantro is seriously what makes or breaks the whole recipe, so use as much as you like!
Cooked Quinoa (plus a little mayo, we'll get to that in a sec!)
Veggies combined

Corn + Veggies
Quinoa + Corn + Veggies
Note: I DOUBLED the recipe in these photos. Hubbs likes to take this for lunch.
After your cooked Quinoa, veggies and cilantro are combined, its time for the "Dressing." I have made this so many times I just combine everything at once rather than separate but you can do whatever works for you! The dressing is a combo of: 1/4 cup of Olive Oil, a couple tablespoons of mayo, lemon and lime juice (to taste), kosher salt, and black pepper! Mix it all up reallllllly well... add some feta......... and mix some more!
Tadaaa! Easy, huh? We have eaten this warm and cold - but we prefer it cold, like a pasta salad. Like I said, Andrew takes a cup or so for lunch since its got all the nutrients of a meal packed into one easy peasy dish - if I double the recipe it lasts us a meal + leftovers for his lunch all week! I've been asked for this recipe so many times by friends... it has definitely been a hit!

Delicious and nutritious... and husband-AND-mom-approved :)

Have you guys ever made quinoa recipes? What are your faves?? Here are some more suggestions for cooking w/ quinoa! If you try any, let me know what you think!